Table of Contents
Spark-Core Hacking: Read MQ2 sensor data
The aquarius needs a galley in order to prepare and cook food but due to unforeseen personal circumstances I had to invest into this infrastructure way before than it was actually necessary - since the base trailer for the LM isn't available yet. So I've started to build a prototype kitchen with all that is needed for functional and fun food hacking. One of the primary energy carriers selected for cooking is gas. That can be either LPG (Propane/Butane) or Methane (delivered by utility gas lines).
Since gases can be tricky and risky energy carriers and their combustion process also creates potentially harmful by-products like Carbon-Monoxide (CO), it seemed prudent to have an autonomous environmental monitoring and gas leakage detection system, in order to minimize the risk of an undetected leak, which could lead to potentially harmful explosions or a high concentration of CO, which could also lead to unconsciousness and death. Monitoring the temperature and humidity might also help in preventing moisture buildup which often leads to fungi problems.
To cover everything, a whole team of sensors monitors specific environmental targets and their data will then be fused to form a basis for air quality analysis and threat management to either proactively start to vent air or send out warnings via mail/audio/visual.
| Sensor | Target | Description | Placement |
|---|---|---|---|
| MQ7 | CO | Carbon-monoxide (Combustion product) | Top/Ceiling |
| MQ4 | CH4 | Methane (Natural Gas) | Top/Ceiling |
| MQ2 | C3H8 | Propane (Camping Gas Mix) | Bottom/Floor |
| MQ2 | C4H10 | Butane (Camping Gas Mix) | Bottom/Floor |
| SHT71 | Temp/Humidity | Room/Air Temperature & Humidity Monitoring | Top |
As a platform for this project a spark-core was selected, since it's a low power device with wireless network connectivity, which has to be always on, to justify its existence. The Spark-Core docs claim 50mA typical current consumption but it clocked in here with 140mA (Tinker Firmware - avg(24h)). After setting up a local spark cloud and claiming the first core it was time to tinker with it.
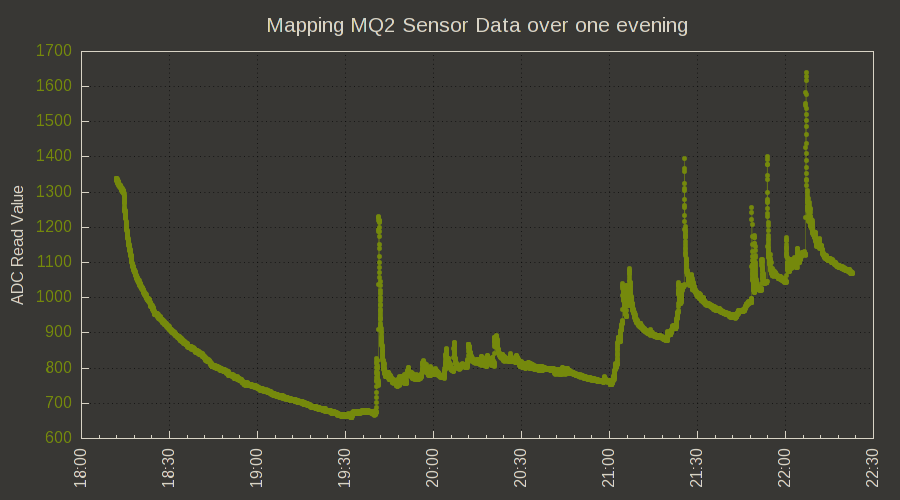
The default firmware (called tinker) already get's you started quickly with no fuss: You can read and control all digital and analog in- and outputs. With just a quick GNUPlot/watch hack I could monitor what a MQ2 sensor detects over the period of one evening, without even having to hack on the firmware code itself (fast bootstrapping to get a first prototype/concept).
Hardware
- Spark-Core + SC Breadboard
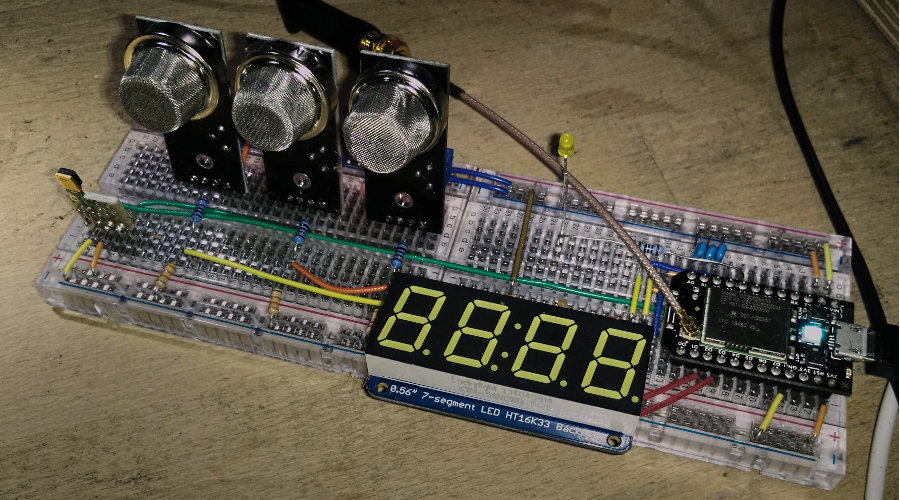
- Sainsmart MQ2/MQ4/MQ7 el cheapo sensor boards
- Sensirion SHT71 Temperature & Humidity Sensor
- 6 Resistors (Voltage Divider Rx/Ry: 10k/33k
- Adafruit 7-Segment LED Display with HT16K33 controller
Software
Have a look at the local spark-cloud howto, to get an easy start with spark-cores without having to use the official. You can also repeat the following procedures using the official cloud server too, then you only need to install Spark-CLI and add your global cloud account settings to its configuration.
This is an example how to read ADC input A0 through the API, connected to the MQ2 sensor in this case:
#!/bin/bash

while :
do
    VAL=$(spark call 1234567890abcdef analogread "A0")
    TS=$(date +%s)
    echo "${TS} ${VAL}"
    echo "${TS} ${VAL}" >> mq2-test.txt
    sleep 1
done;
$ vi mq2-gnuplot.parm
set terminal pngcairo background "#383734" size 900,500 enhanced font 'Arimo,12'
set output "mq2-chart.png"

set title "Mapping MQ2 Sensor Data over one evening" textcolor ls 2 font 'Arial,16'
set grid
set lmargin 9

set style line 1 lc rgb '#75890c' lt 1 lw 0.5 pt 7 ps 0.75
set style line 2 lt 2 lc rgb "#d8d3c5" pt 6

set ylabel "ADC Read Value" tc ls 2 offset 1,0

set xtics textcolor linestyle 2 rotate
set ytics textcolor linestyle 1
set tics nomirror

set xdata time
set timefmt "%s"
set format x "%H:%M"

set border linewidth 1 linestyle 2

unset key

plot "mq2-test.txt" using 1:2 with linespoints ls 1

quit
$ watch --interval=1 gnuplot mq2-gnuplot.parm
You can use Ristretto or any other image viewer to look at the resulting png. Ristretto automatically redraws the image, as soon as gnuplot finishes the next one.

